SNMP is a very old protocol, dating back to 1988 and was elaborated later in 90s. When it comes to hardware monitoring, however, nearly every device supports at least SNMPv2. This makes it the “good enough” choice for basic monitoring of devices.
In this article, we create a Apache NiFi data flow, which will collect SNMP tables and convert them into Avro format.
Although there is SNMP processor in NiFi available, we will proceed with different approach, since the processor does not support querying SNMP tables. Steps in this article include:
- Preparing sandbox environment – simulator for SNMP server, setting up command line tools to grab SNMP tables (ifTable is used as an exapmle)
- Designing the NiFi DataFlow – step-by-step data flow design instructions to query SNMP server for a table, parse the CSV-like output into Apache Avro format (one record per CSV line).
Preparing sandbox environment
If we do not have SNMP data source (e.g. router, network printer, other OS connected to same network as our host is), we can create a mock SNMP data source. To do this, we grab snmpsim, which can be installed using apt package manager (when using Debian):
sudo apt-get -y install snmpsim
or follow installation guide.
To obtain SNMP data, we will use notoriously known Net-SNMP suite, which can be installed using apt:
sudo apt-get -y install snmp
To start our simulated SNMP server, we run
snmpsimd --data-dir /usr/share/doc/snmpsim/examples/data/1.3.6.1.6.1.1.0/ --agent-udpv4-endpoint=127.0.0.1:1610
if you do not have the example file /usr/share/doc/snmpsim/examples/data/1.3.6.1.6.1.1.0/127.0.0.1.snmprec, you may download it from github.
From the output of snmpsimd, we can see the community name we should use for retrieval:
Scanning "/usr/share/doc/snmpsim/examples/data/1.3.6.1.6.1.1.0/" directory for  *.snmpwalk, *.MVC, *.sapwalk, *.snmprec, *.dump data files...
==================================================================
Configuring /usr/share/doc/snmpsim/examples/data/1.3.6.1.6.1.1.0//127.0.0.1.snmprec controller
SNMPv1/2c community name: 127.0.0.1
SNMPv3 context name: f528764d624db129b32c21fbca0cb8d6
Lets test the SNMP is responding:
snmpwalk -v 2c -c 127.0.0.1 127.0.0.1:1610 1
Output should look like:
iso.3.6.1.2.1.2.2.1.1.1 = INTEGER: 1
iso.3.6.1.2.1.2.2.1.1.2 = INTEGER: 2
iso.3.6.1.2.1.2.2.1.1.3 = INTEGER: 3
iso.3.6.1.2.1.2.2.1.1.4 = INTEGER: 4
iso.3.6.1.2.1.2.2.1.1.5 = INTEGER: 5
iso.3.6.1.2.1.2.2.1.2.1 = STRING: "lo0"
iso.3.6.1.2.1.2.2.1.2.2 = STRING: "gif0"
iso.3.6.1.2.1.2.2.1.2.3 = STRING: "stf0"
iso.3.6.1.2.1.2.2.1.2.4 = STRING: "en0"
iso.3.6.1.2.1.2.2.1.2.5 = STRING: "p2p0"
iso.3.6.1.2.1.2.2.1.3.1 = INTEGER: 24
iso.3.6.1.2.1.2.2.1.3.2 = INTEGER: 55
iso.3.6.1.2.1.2.2.1.3.3 = INTEGER: 57
iso.3.6.1.2.1.2.2.1.3.4 = INTEGER: 6
iso.3.6.1.2.1.2.2.1.3.5 = INTEGER: 6
...
There are to things to note here:
- Output is not translated according to MIBs (there are just numbers, nothing really human-readable)
- Output is prefixed by
1.3.6.1.2.1.2.2, which, if your are SNMP guru is obvious to you, is theifTabletable.
To resolve the 1., you can use snmp-mibs-downloader, see the Debian How-To on SNMP. Only after we have the necessary MIBs in place, we can proceed to 2.
To see the ifTable table (table containing all device network interfaces) printed out in table format, use the snmptable command:
snmptable -v 2c -c 127.0.0.1 127.0.0.1:1610 ifTable
Output should look like this:
SNMP table: IF-MIB::ifTable

ifIndex ifDescr           ifType ifMtu  ifSpeed   ifPhysAddress ifAdminStatus ifOperStatus ifLastChange ifInOctets ifInUcastPkts ifInNUcastPkts ifInDiscards ifInErrors ifInUnknownProtos ifOutOctets ifOutUcastPkts ifOutNUcastPkts ifOutDiscards ifOutErrors ifOutQLen              ifSpecific
1     lo0 softwareLoopback 16384        0                            up           up 0:0:00:00.00    2429666         37027              0            0          0                 0     2429666          20720               0             0           0         0 SNMPv2-SMI::zeroDotZero
2    gif0        ieee80212  1280        0                          down         down 0:0:00:00.00          0             0              0            0          0                 0           0              0               0             0           0         0 SNMPv2-SMI::zeroDotZero
3    stf0   hippiInterface  1280        0                          down         down 0:0:00:00.00          0             0              0            0          0                 0           0              0               0             0           0         0 SNMPv2-SMI::zeroDotZero
4     en0   ethernetCsmacd  1500 10000000 0:8d:12:f:4f:a4            up           up 0:0:00:00.00  190522483        276146              0            0          0                 0    34763800         225062               0             0           0         0 SNMPv2-SMI::zeroDotZero
5    p2p0   ethernetCsmacd  2304 10000000 0:8d:12:f:4f:a4            up           up 0:0:00:00.00          0             0              0            0          0                 0           0              0               0             0           0         0 SNMPv2-SMI::zeroDotZero
Now we are prepared to start NiFi development.
Designing NiFi DataFlow
If not done already, we download NiFi package nifi-1.0.0-bin.tar.gz from the NiFi downloads page, unpack and start the NiFi instance.
By default it will start to listen on localhost:8080.
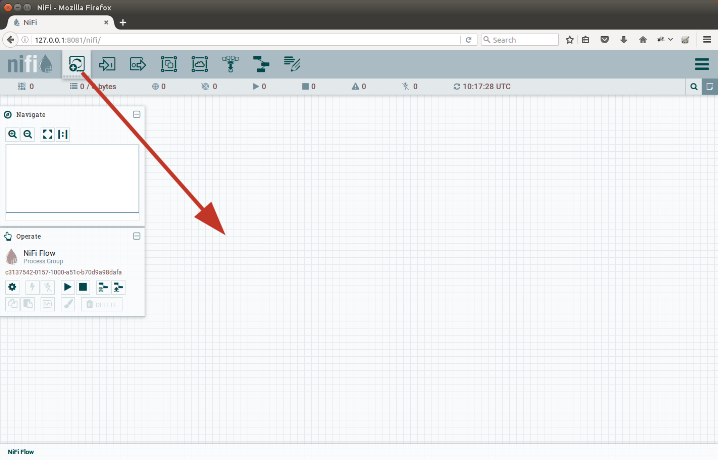
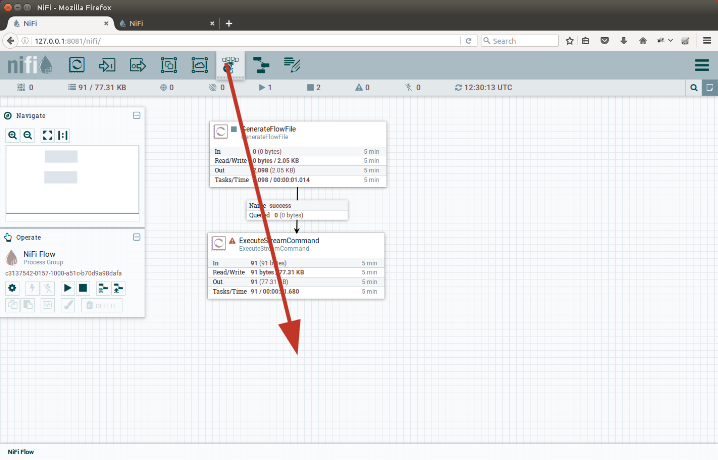
First, we add a GenerateFlowFile processor. Drag the processor icon from top-left to the canvas as shown on the picture:
 |
|---|
| Drag the processor icon to the canvas |
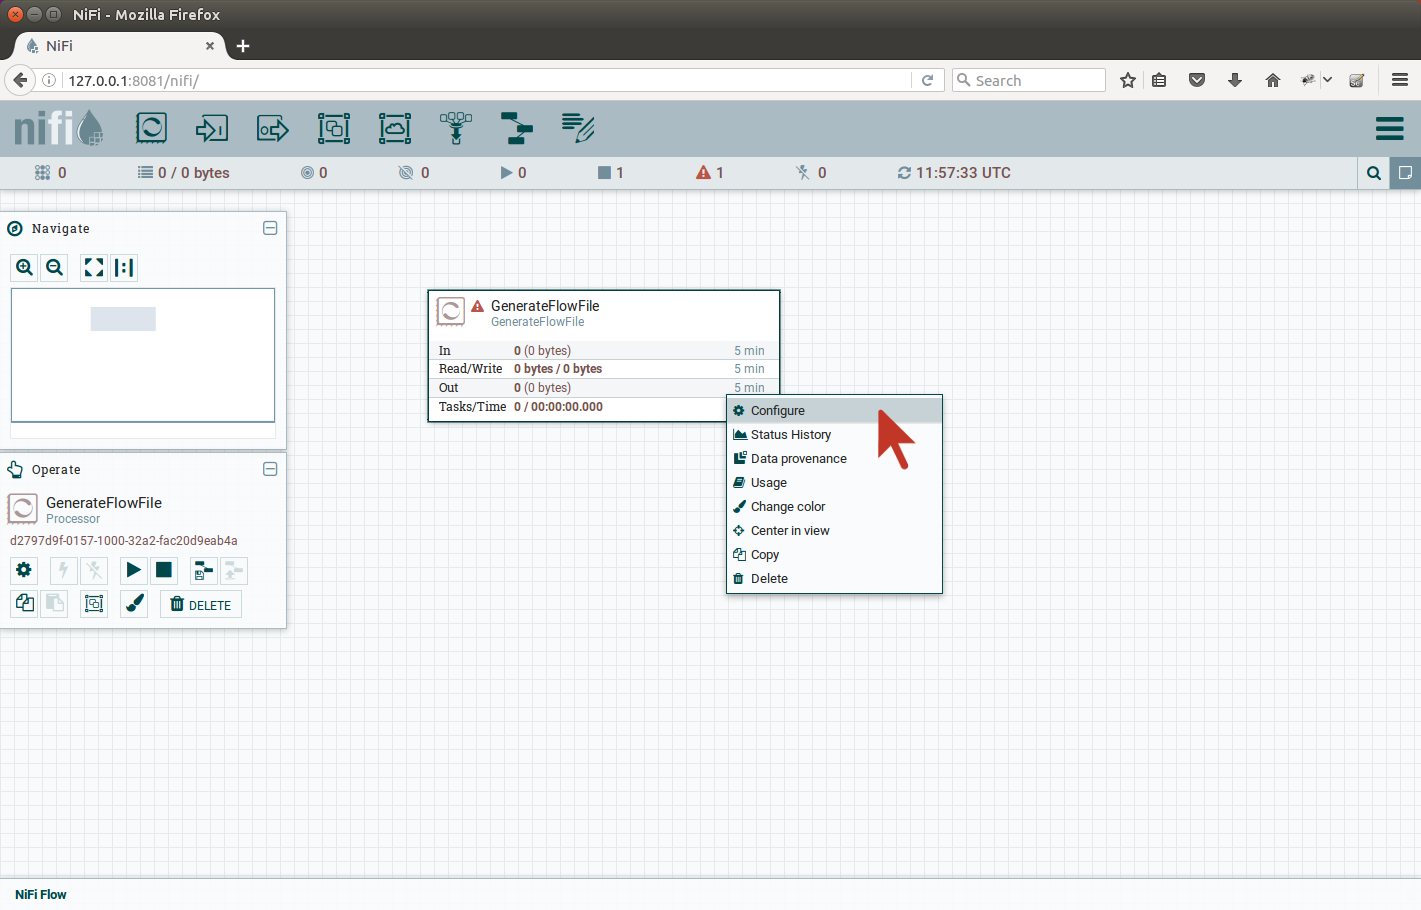
Search for GenerateFlowFile processor and select it for adding. After it is created on canvas, right-click the processor and configure it:
 |
|---|
| Right click the processor and select Configure |
Lets configure our processor to run once a minute.
On a Scheduling tab, change the Run Schedule value from 0 sec to 1 min (NiFi understands “sec” and “min” keywords).
On the Properties tab, we have to fill in the File Size attribute, lets put 1b as the value.
This content will be rewritten by ExecuteStreamCommand we add right after the GenerateFlowFile.
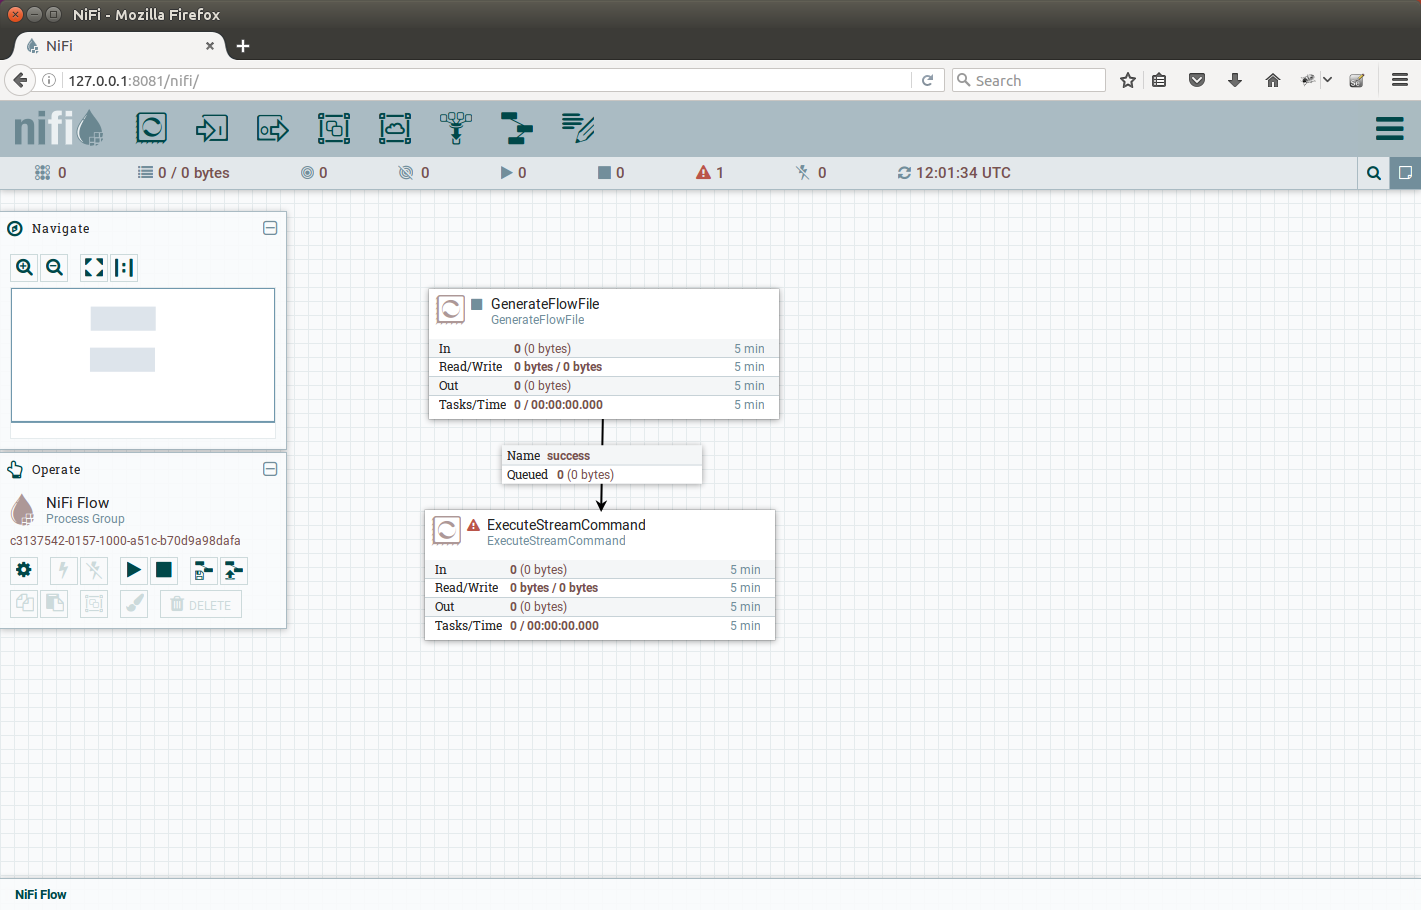
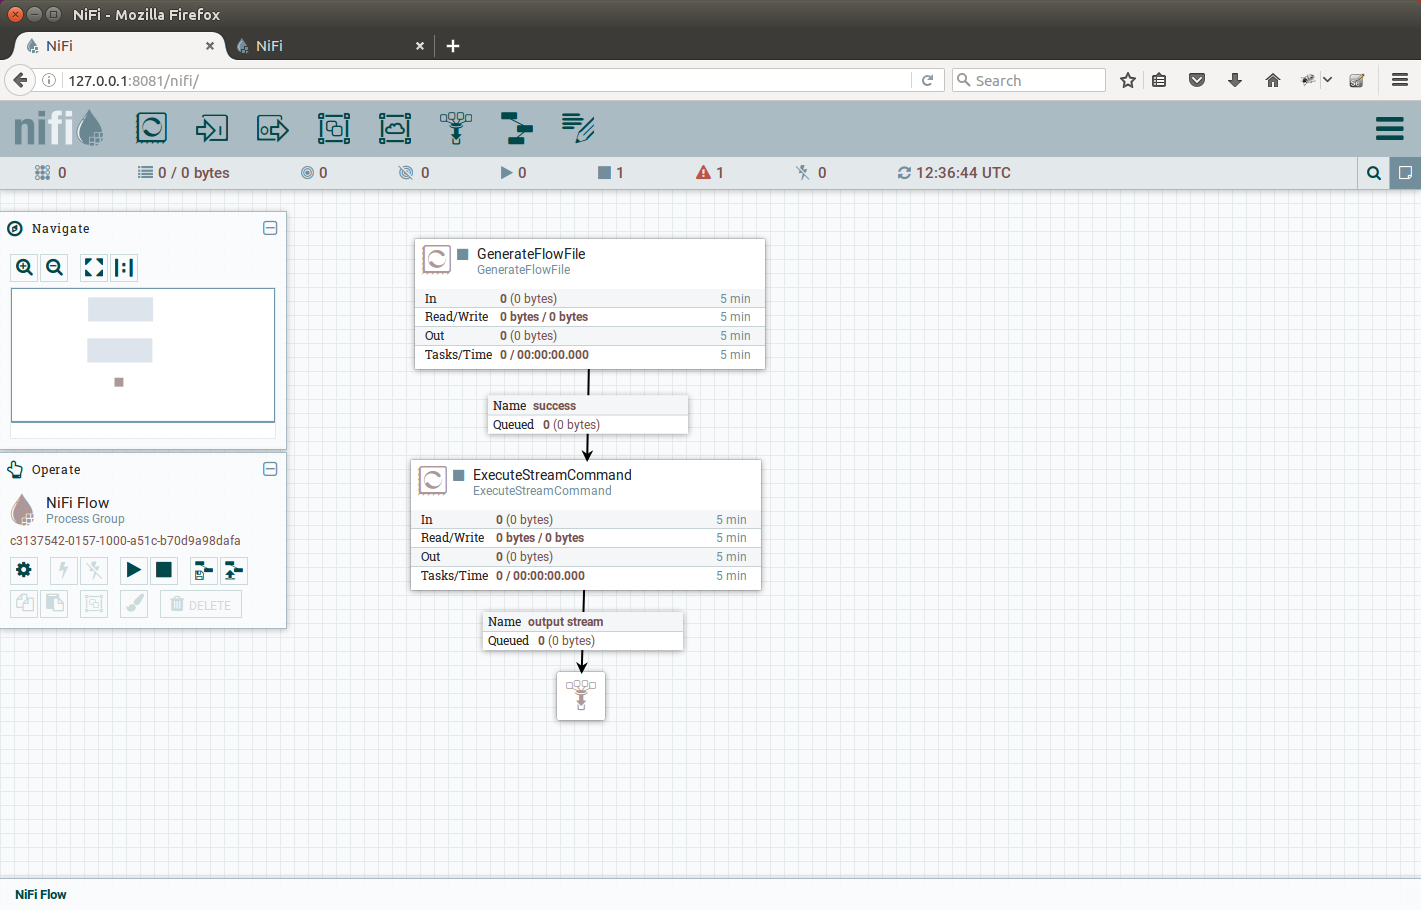
Now we add the ExecuteStreamCommand processor, connect it with the generator on a Success connection.
The flow should look like on the picture:
 |
|---|
ExecuteStreamCommand processor is connected to the GenerateFlowFile success output |
Now the interesting part, configuring the ExecuteStreamCommand: on Settings tab, we check the Auto Terminate Relationshis: original checkbox,
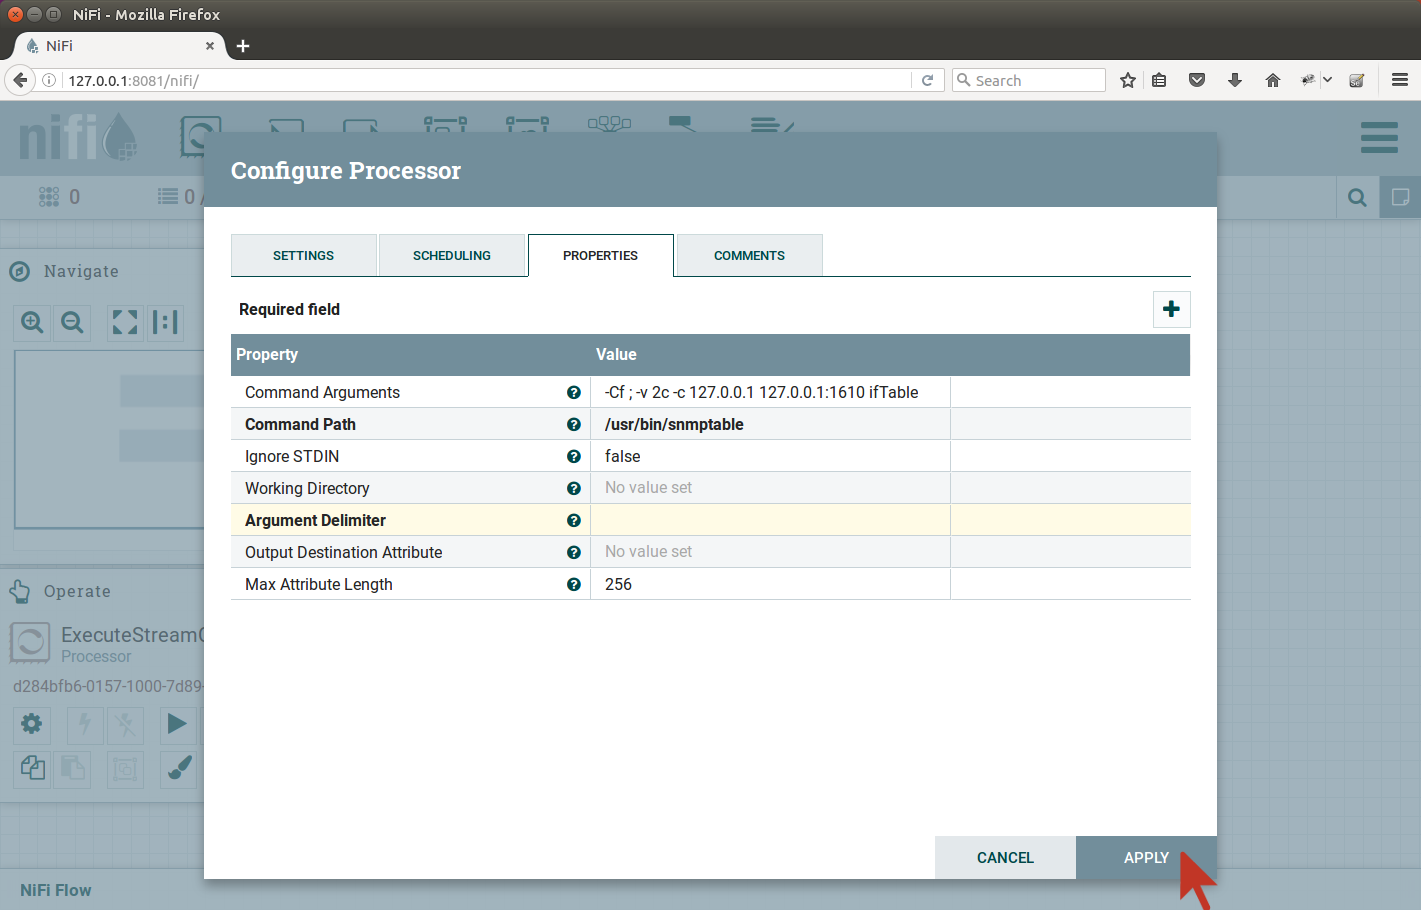
we are only interested in output of the command. On Properties tab, we have to fill all the details to execute the snmptable process the same way,
we have executed it earlier from command line. With the except of one argument -Cf ; which specifies the delimiter in outputted table
to be semicolon for better parsing the output later in the chain.
The Command Path to execute is /usr/bin/snmptable and the command arguments are:
-Cf ; -v 2c -c 127.0.0.1 127.0.0.1:1610 ifTable
The Argument Delimiter has to be ” ” – space character (ASCII 32).
The configuration should look like on the picture:
 |
|---|
ExecuteStreamCommand configuration Properties tab |
Lets test our development so far, add the Funnel, connect it to ExecuteStreamCommand output stream relationship:
 |
|---|
Drag the Funnel icon to the canvas |
 |
|---|
Canvas after Funnel has been added |
Now start the processors by right clicking and selecting start.
Immediately, there should be one file queued after the ExecuteStreamCommand processor.
Stop the GenerateFlowFile processor and examinate the file produced.
To do so, we right-click the output-stream connection to the Funnel and select the List Queue.
There should be one flow file queued, we click on the small info icon on the left:
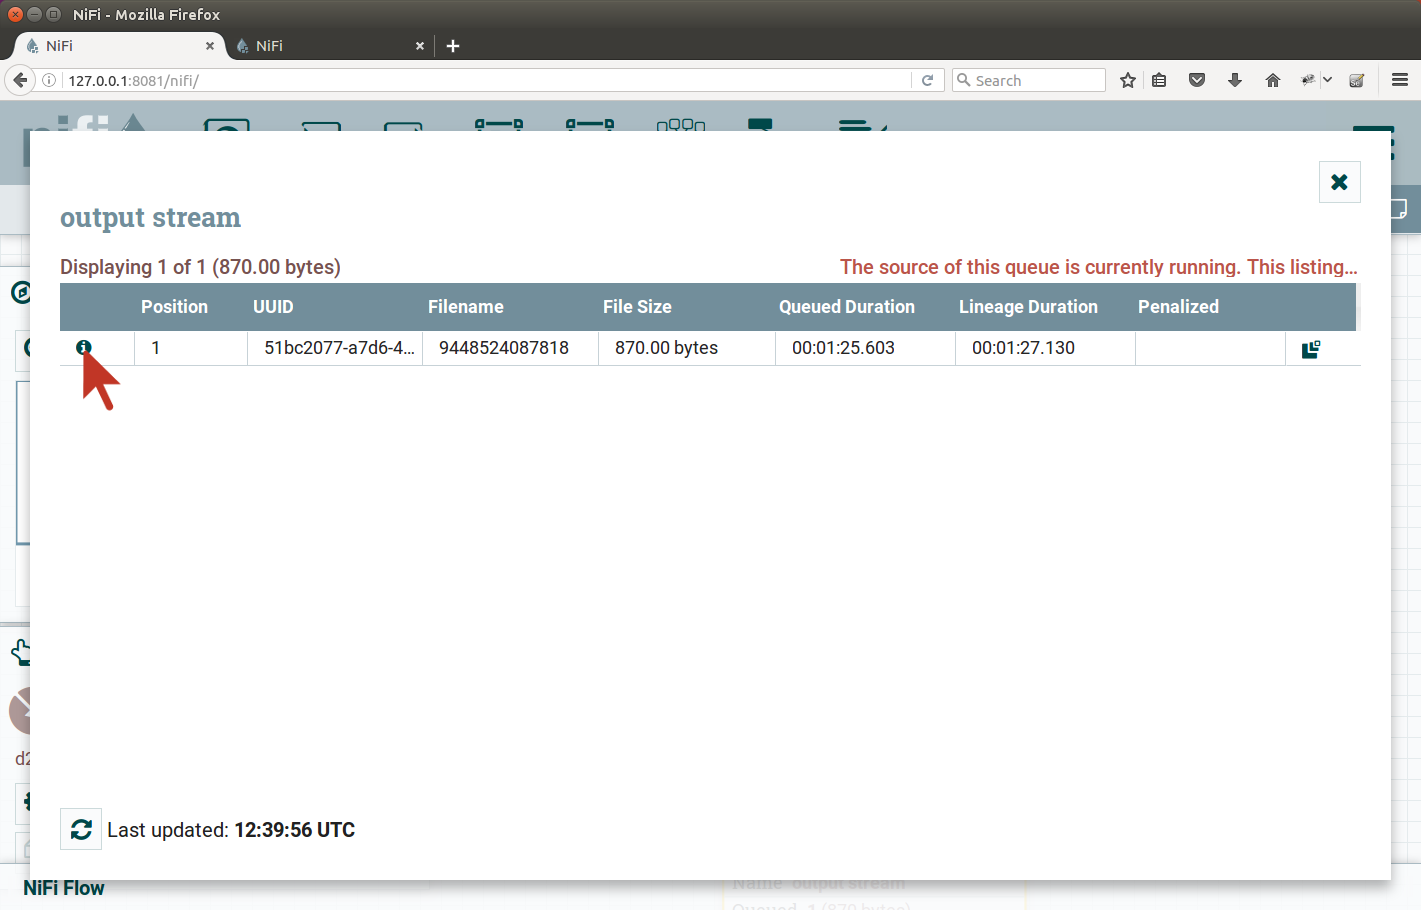 |
|---|
| Click the info icon on the left |
From the next dialog, select to Download or View the file contents. The contents should look like this:
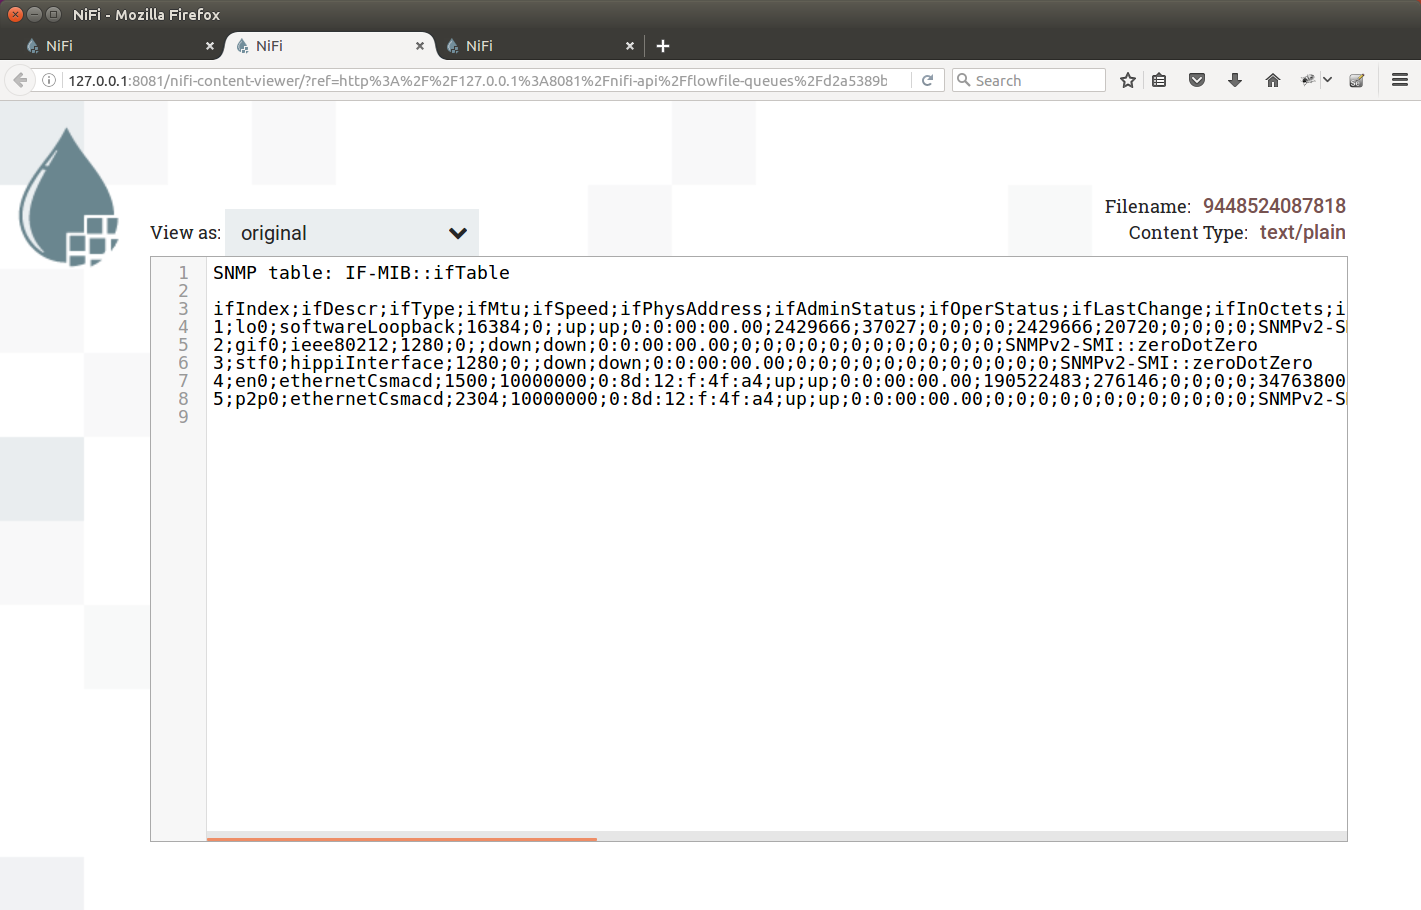 |
|---|
| Viewing file contents using NiFi view file |
As we can see, our table is no longer in TSV format.
We have added the -Cf ; argument to the snmptable command, which turns the output to be nearly the CSV (but we use semicolon instead of comma).
All we have to do now, is to
- Skip the first two lines
- Use
InferAvroSchemaprocessor or specify Avro schema manually for theConvertCSVToAvroprocessor - Use
ConvertCSVToAvroprocessor to turn CSV into Avro records – one per CSV line (we will omit the header). - Output the data to files.
Skip the first two lines
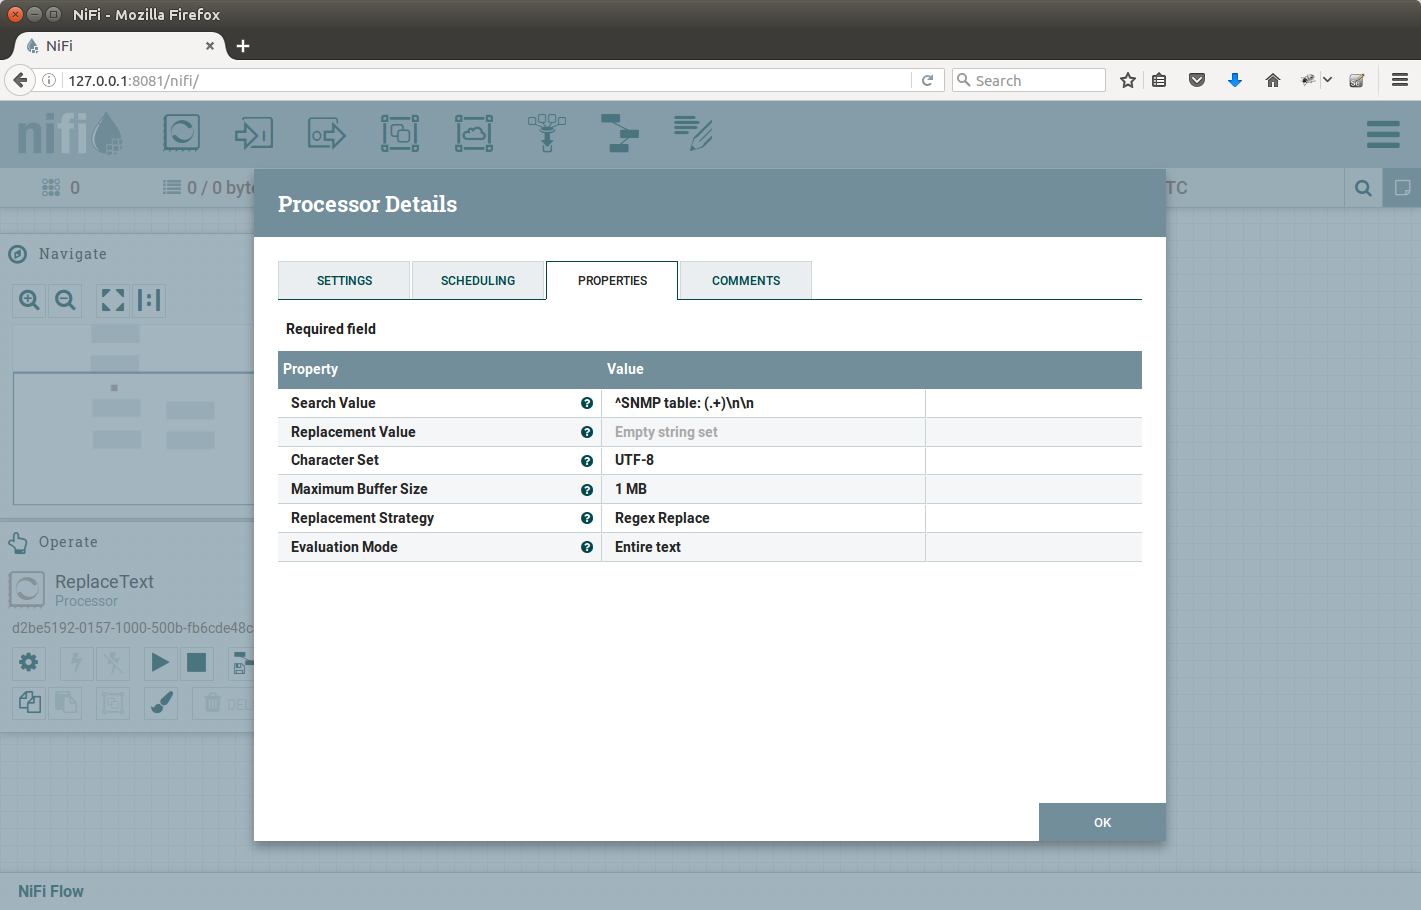
Add the ReplaceText processor, Search Value is
^SNMP table: (.+)\n\n
Replacement is empty string. Auto-terminate all connections we do not need right now. Configuration screenshot:
 |
|---|
ReplaceText configuration |
Use InferAvroSchema processor
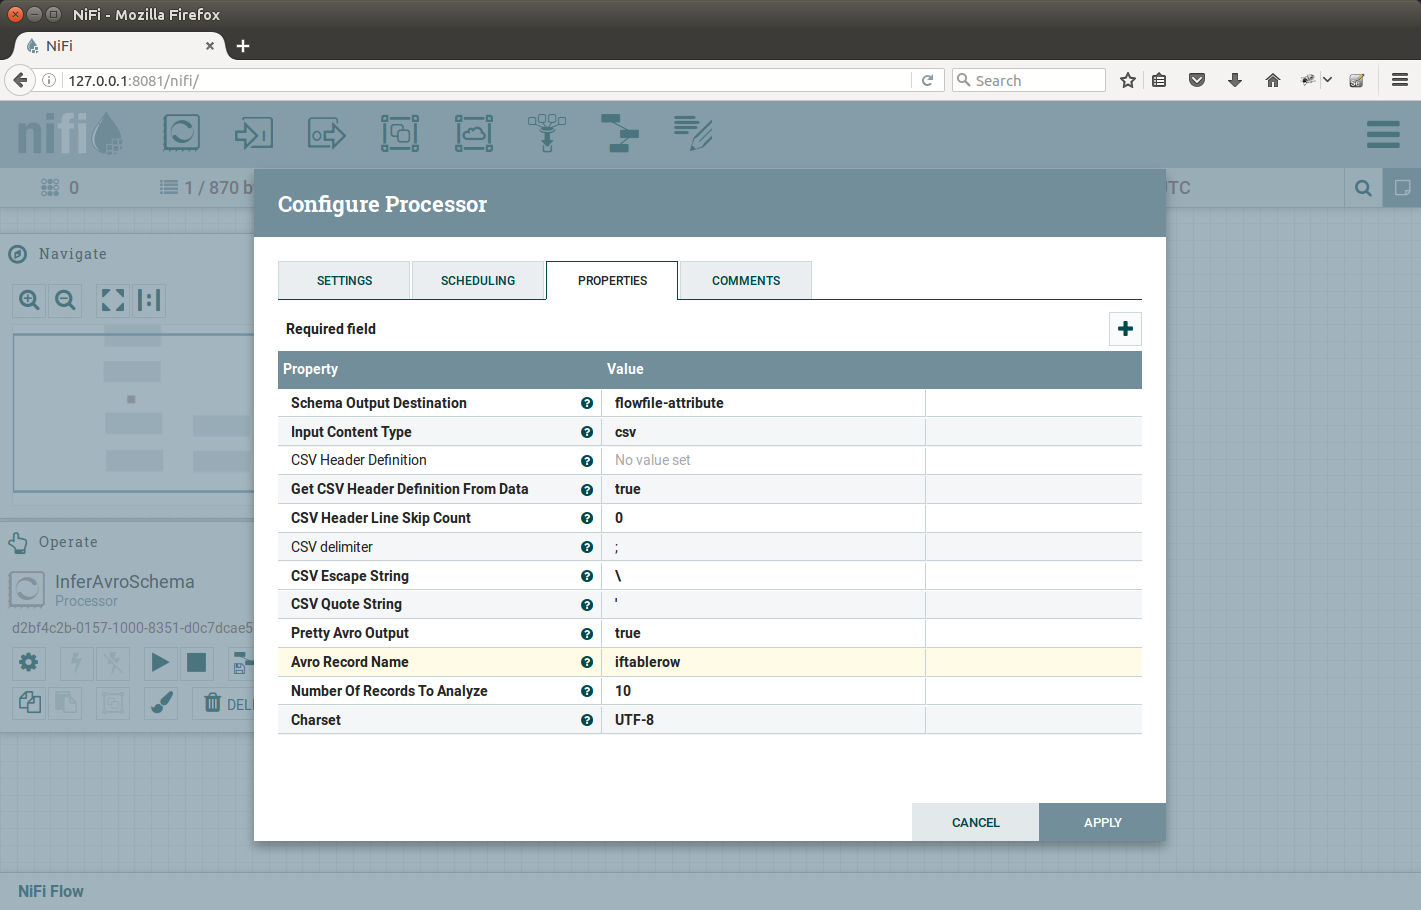
Add the InferAvroSchema processor, connect it to output of ReplaceText. Auto-terminate all connections we do not need right now. Configure the InferAvroSchema:
- Schema Output Destination: FlowFile Attribute
- Input Content Type: CSV
- CSV delimiter:
;
Configuration captured in the picture:
 |
|---|
InferAvroSchema configuration |
Use ConvertCSVToAvro processor
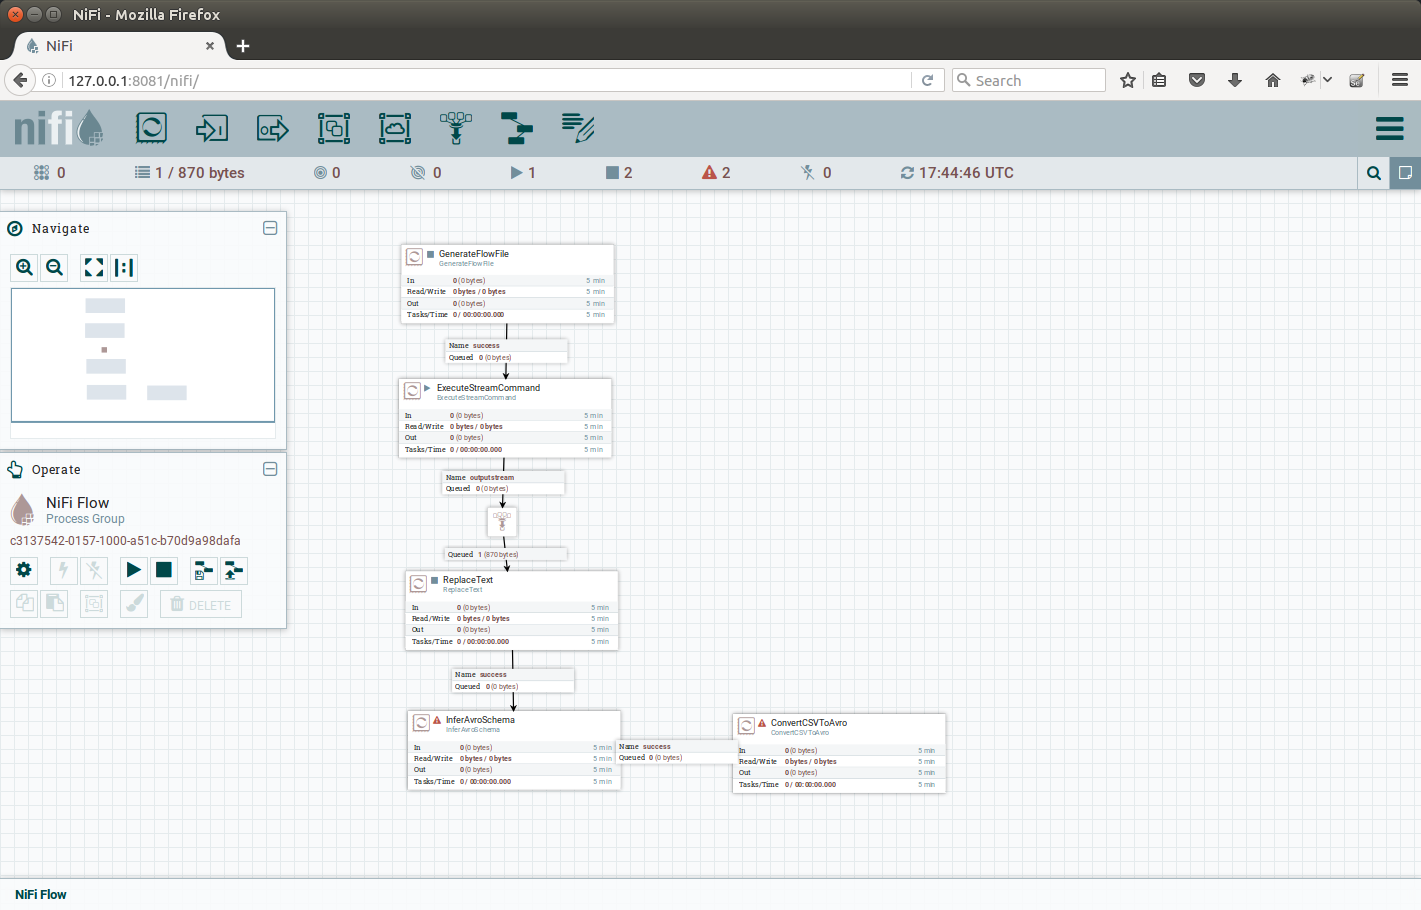
Add the ConvertCSVToAvro processor, the data flow should look like on the picture:
 |
|---|
After adding ConvertCSVToAvro processor |
Auto-terminate all output connections we are not interested in. When configuring ConvertCSVToAvro, we will quickly find out that there is a mandatory attribute called Record schema. But where do we find that?
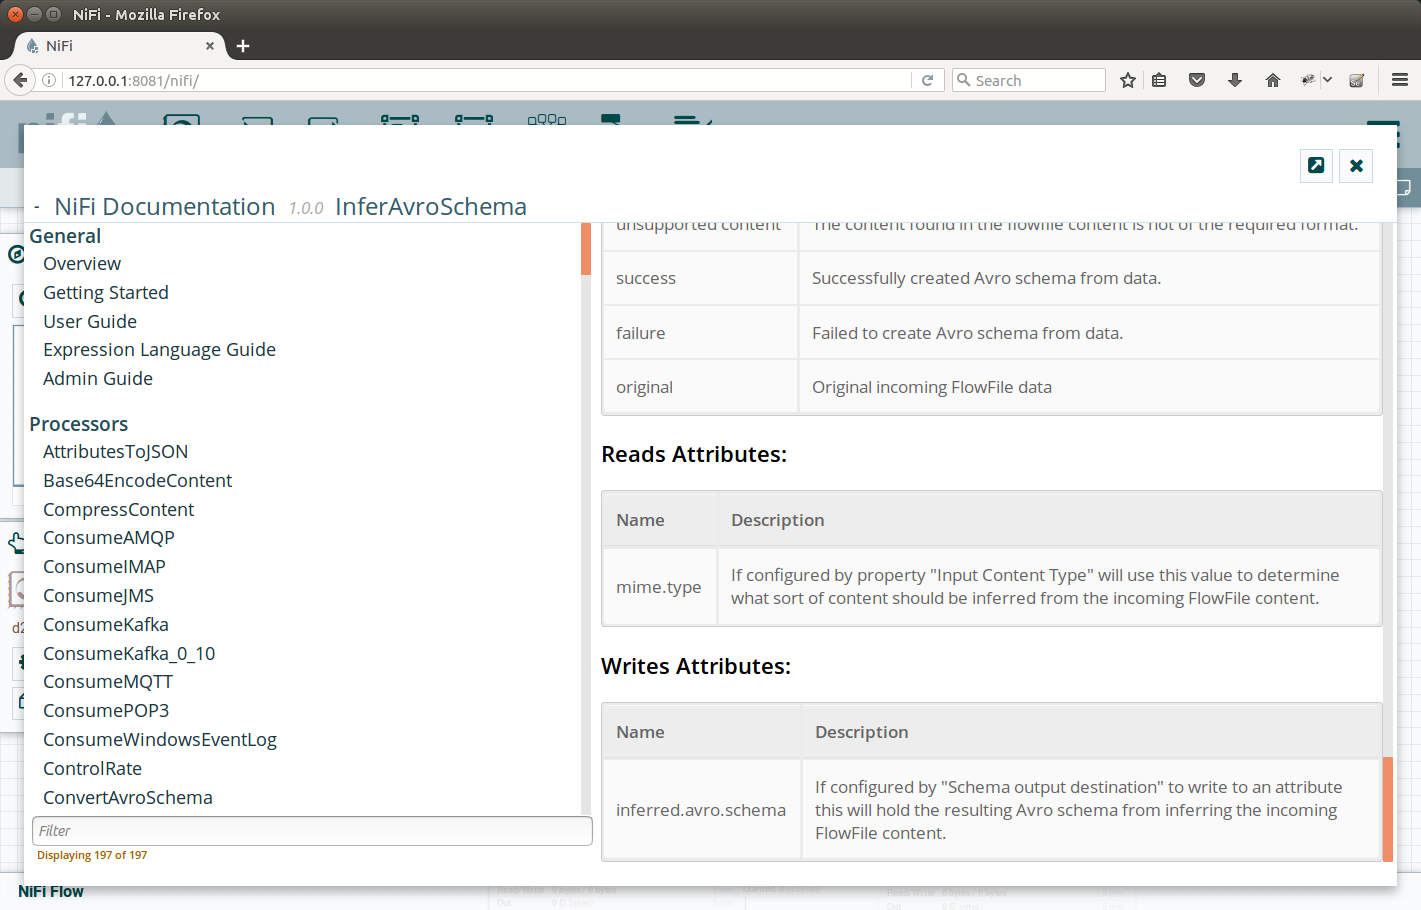
Remember the configuration of InferAvroSchema? We set it to put the inferred schema into some attribute, but what’s the name of that? As we are hurrying a little bit, we did not mention nice feature of NiFi and processors, and that is the Usage page. Each processor author creates one. Lets explore the one for InferAvroSchema, its accessible in NiFi UI by right-clicking the InferAvroSchema and selecting Usage. There, we can see at the bottom, the list of Attributes the processor writes. See the screenshot:
 |
|---|
| Bottom of the InferAvroSchema ‘man page’ - the Usage |
So the name of the property the InferAvroSchema writes the inferred schema into, is inferred.avro.schema.
We will use this attribute as the input for configuring the ConvertCSVToAvro.
To do this, we put ${inferred.avro.schema} into the property value.
This brings us to another topic in NiFi: Expression language (which is out of the scope of this tutorial). Lets just point out, that we can do some basic string manipulation, to- and from- date, math arithmetic and insertion of some special values (like uuid for example). But basic function of the expression language is to supply the existing attributes of FlowFiles into the properties of processors. And that is our case.
The configuration is on the picture (also see we changed the CSV delimiter to semicolon):
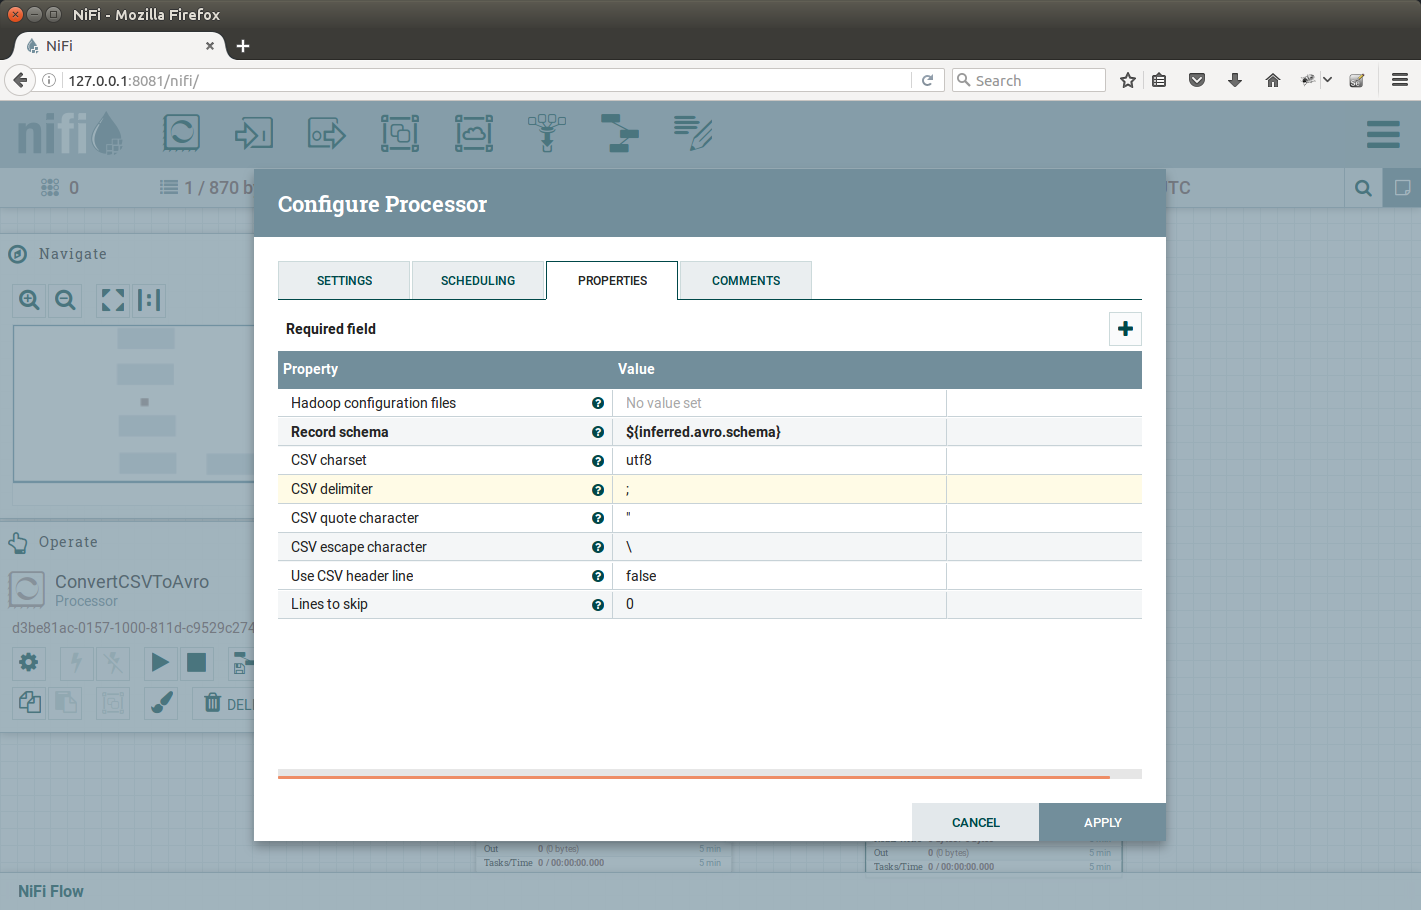 |
|---|
ConvertCSVToAvro configuration |
Output the data to files
Add a PutFile processor, connect the output from ConvertCSVToAvro to PutFile. Set the desired output destination (/home/ubuntu/nifi/data in our case).
After all is done, start all the processors by clicking Play icon on the left. You won’t be able to see it for the first time, here is a picture to better find it:
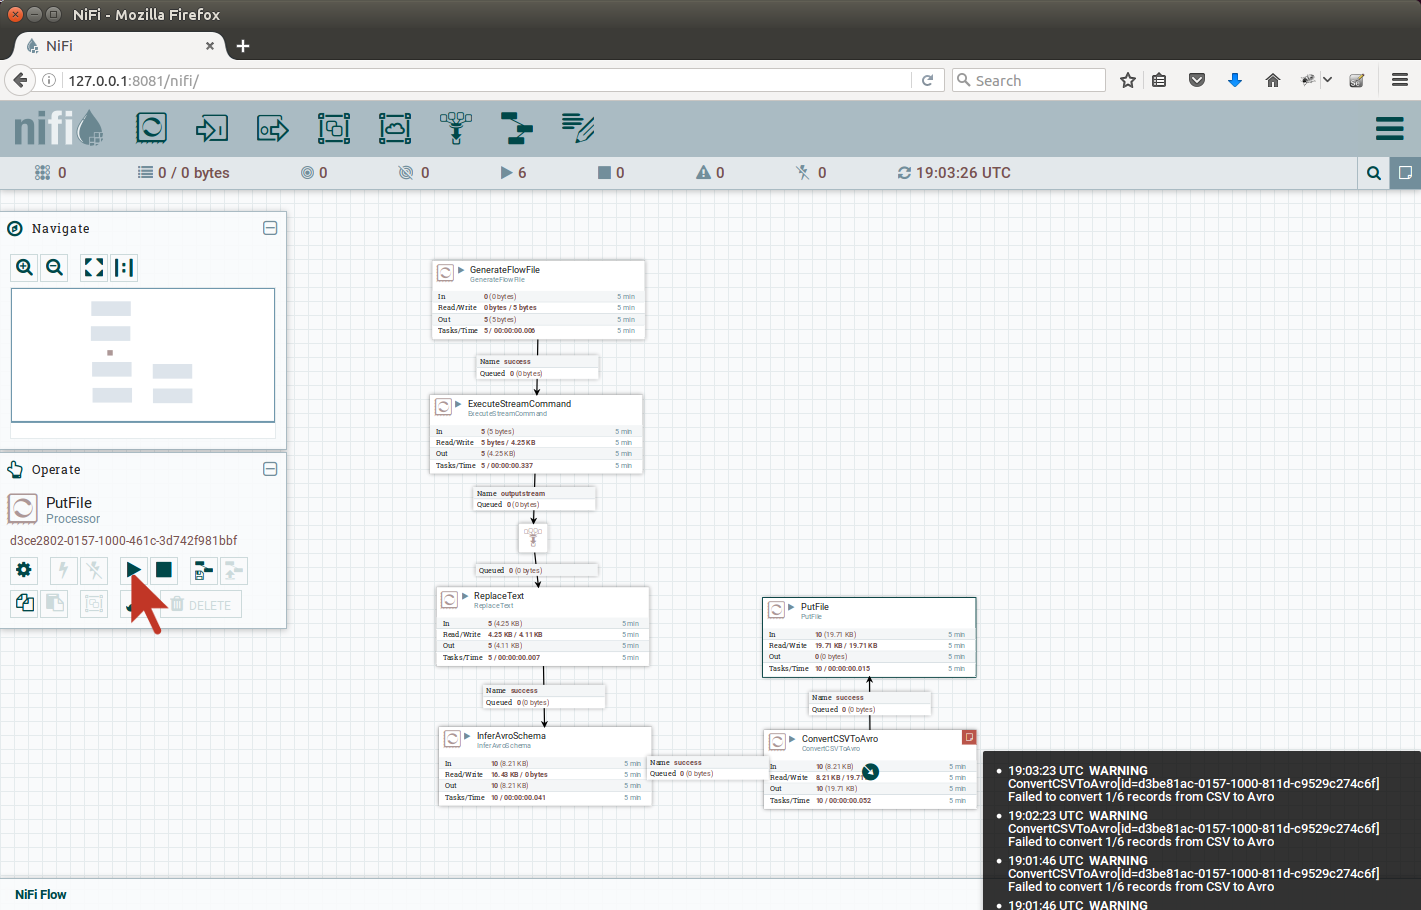 |
|---|
| Start all processors in the view |
After we started the flow, we noticed red icon in the corner of ConvertCSVToAvro, pointing a mouse there will reveal the errors:
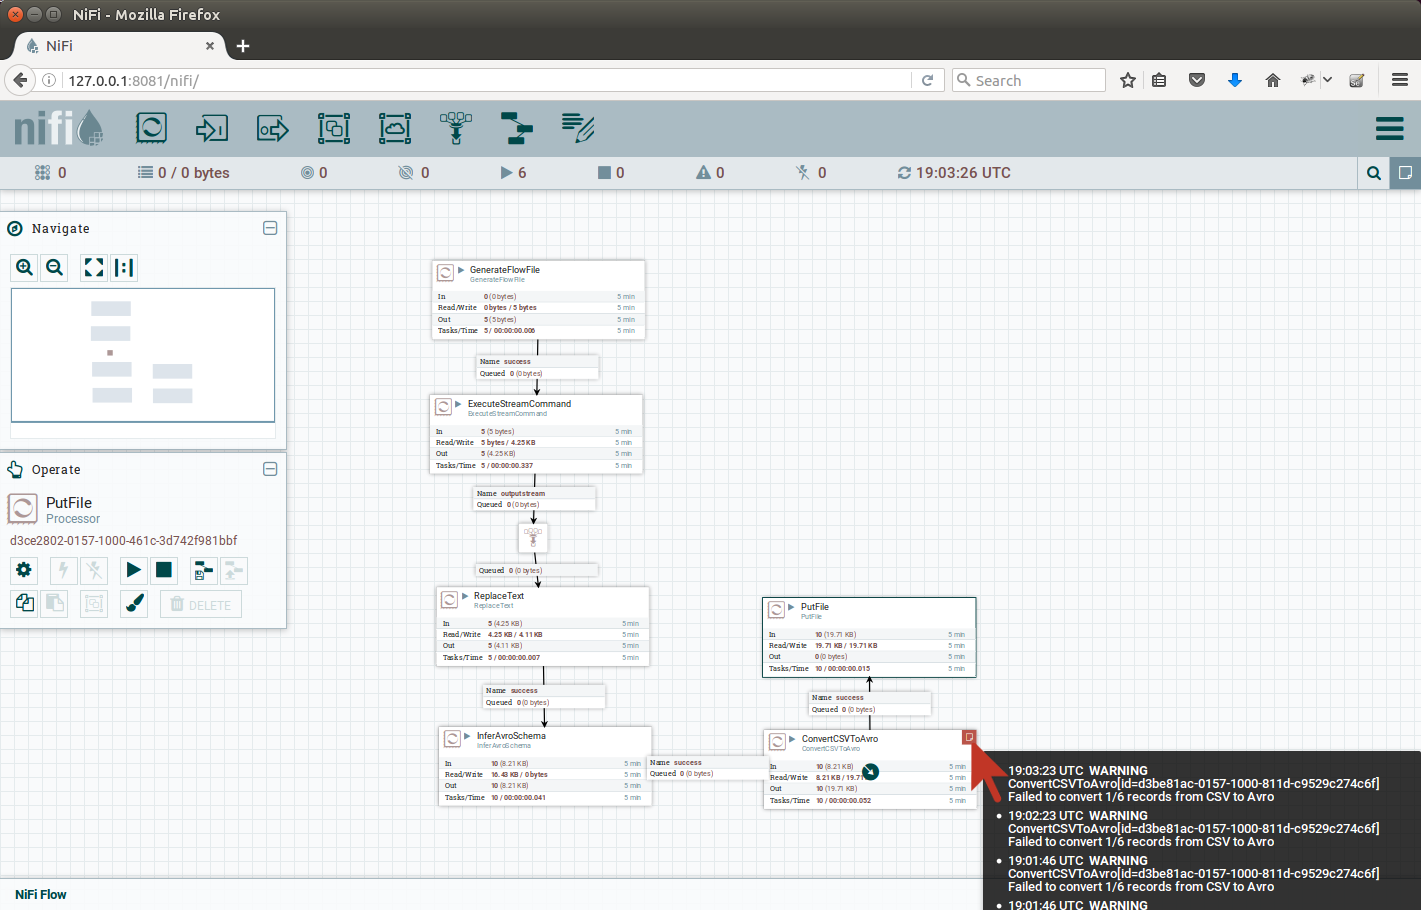 |
|---|
| Errors logged by ConvertCSVToAvro |
This is due some of the columns have invalid values, which do not conform to the schema. This is for further investigation, either we have incorrect data or the schema inferrence guessed wrong type for the column. We will omit this investigation for the scope of this article.
Lets look onto the output we have got, using the avro-tools.jar. Directory listing after a while:
vagrant@nk-local-01:/home/ubuntu/nifi/data$ ls -alh
total 56K
drwxr-xr-x 2 root root 4.0K Oct 17 19:14 .
drwxr-xr-x 3 root root 4.0K Oct 17 19:03 ..
-rw-r--r-- 1 root root 2.0K Oct 17 19:03 16354893289486.avro
-rw-r--r-- 1 root root 2.0K Oct 17 19:04 16414894098471.avro
-rw-r--r-- 1 root root 2.0K Oct 17 19:05 16474895101324.avro
-rw-r--r-- 1 root root 2.0K Oct 17 19:06 16534896021837.avro
-rw-r--r-- 1 root root 2.0K Oct 17 19:07 16594898207011.avro
-rw-r--r-- 1 root root 2.0K Oct 17 19:08 16654898960594.avro
-rw-r--r-- 1 root root 2.0K Oct 17 19:09 16714899887539.avro
-rw-r--r-- 1 root root 2.0K Oct 17 19:10 16774901243445.avro
-rw-r--r-- 1 root root 2.0K Oct 17 19:11 16834902686816.avro
-rw-r--r-- 1 root root 2.0K Oct 17 19:12 16894903695154.avro
-rw-r--r-- 1 root root 2.0K Oct 17 19:13 16954905312644.avro
-rw-r--r-- 1 root root 2.0K Oct 17 19:14 17014906216800.avro
Lets inspect one of the files using avro-tools:
vagrant@nk-local-01:/home/ubuntu/nifi/data$ java -jar /vagrant/avro-tools-1.8.1.jar tojson -pretty 16954905312644.avro
log4j:WARN No appenders could be found for logger (org.apache.hadoop.metrics2.lib.MutableMetricsFactory).
log4j:WARN Please initialize the log4j system properly.
log4j:WARN See http://logging.apache.org/log4j/1.2/faq.html#noconfig for more info.
{
  "ifIndex" : 1,
  "ifDescr" : "lo0",
  "ifType" : "softwareLoopback",
  "ifMtu" : 16384,
  "ifSpeed" : 0,
  "ifPhysAddress" : "",
  "ifAdminStatus" : "up",
  "ifOperStatus" : "up",
  "ifLastChange" : "0:0:00:00.00",
  "ifInOctets" : 2429666,
  "ifInUcastPkts" : 37027,
  "ifInNUcastPkts" : 0,
  "ifInDiscards" : 0,
  "ifInErrors" : 0,
  "ifInUnknownProtos" : 0,
  "ifOutOctets" : 2429666,
  "ifOutUcastPkts" : 20720,
  "ifOutNUcastPkts" : 0,
  "ifOutDiscards" : 0,
  "ifOutErrors" : 0,
  "ifOutQLen" : 0,
  "ifSpecific" : "SNMPv2-SMI::zeroDotZero"
}
{
  "ifIndex" : 2,
  "ifDescr" : "gif0",
  "ifType" : "ieee80212",
  "ifMtu" : 1280,
  "ifSpeed" : 0,
  "ifPhysAddress" : "",
  "ifAdminStatus" : "down",
  "ifOperStatus" : "down",
  "ifLastChange" : "0:0:00:00.00",
  "ifInOctets" : 0,
  "ifInUcastPkts" : 0,
  "ifInNUcastPkts" : 0,
  "ifInDiscards" : 0,
  "ifInErrors" : 0,
  "ifInUnknownProtos" : 0,
  "ifOutOctets" : 0,
  "ifOutUcastPkts" : 0,
  "ifOutNUcastPkts" : 0,
  "ifOutDiscards" : 0,
  "ifOutErrors" : 0,
  "ifOutQLen" : 0,
  "ifSpecific" : "SNMPv2-SMI::zeroDotZero"
}
{
  "ifIndex" : 3,
  "ifDescr" : "stf0",
  "ifType" : "hippiInterface",
  "ifMtu" : 1280,
  "ifSpeed" : 0,
  "ifPhysAddress" : "",
  "ifAdminStatus" : "down",
  "ifOperStatus" : "down",
  "ifLastChange" : "0:0:00:00.00",
  "ifInOctets" : 0,
  "ifInUcastPkts" : 0,
  "ifInNUcastPkts" : 0,
  "ifInDiscards" : 0,
  "ifInErrors" : 0,
  "ifInUnknownProtos" : 0,
  "ifOutOctets" : 0,
  "ifOutUcastPkts" : 0,
  "ifOutNUcastPkts" : 0,
  "ifOutDiscards" : 0,
  "ifOutErrors" : 0,
  "ifOutQLen" : 0,
  "ifSpecific" : "SNMPv2-SMI::zeroDotZero"
}
{
  "ifIndex" : 4,
  "ifDescr" : "en0",
  "ifType" : "ethernetCsmacd",
  "ifMtu" : 1500,
  "ifSpeed" : 10000000,
  "ifPhysAddress" : "0:8d:12:f:4f:a4",
  "ifAdminStatus" : "up",
  "ifOperStatus" : "up",
  "ifLastChange" : "0:0:00:00.00",
  "ifInOctets" : 190522483,
  "ifInUcastPkts" : 276146,
  "ifInNUcastPkts" : 0,
  "ifInDiscards" : 0,
  "ifInErrors" : 0,
  "ifInUnknownProtos" : 0,
  "ifOutOctets" : 34763800,
  "ifOutUcastPkts" : 225062,
  "ifOutNUcastPkts" : 0,
  "ifOutDiscards" : 0,
  "ifOutErrors" : 0,
  "ifOutQLen" : 0,
  "ifSpecific" : "SNMPv2-SMI::zeroDotZero"
}
{
  "ifIndex" : 5,
  "ifDescr" : "p2p0",
  "ifType" : "ethernetCsmacd",
  "ifMtu" : 2304,
  "ifSpeed" : 10000000,
  "ifPhysAddress" : "0:8d:12:f:4f:a4",
  "ifAdminStatus" : "up",
  "ifOperStatus" : "up",
  "ifLastChange" : "0:0:00:00.00",
  "ifInOctets" : 0,
  "ifInUcastPkts" : 0,
  "ifInNUcastPkts" : 0,
  "ifInDiscards" : 0,
  "ifInErrors" : 0,
  "ifInUnknownProtos" : 0,
  "ifOutOctets" : 0,
  "ifOutUcastPkts" : 0,
  "ifOutNUcastPkts" : 0,
  "ifOutDiscards" : 0,
  "ifOutErrors" : 0,
  "ifOutQLen" : 0,
  "ifSpecific" : "SNMPv2-SMI::zeroDotZero"
}
Conclusion
We have shown the process of obtaining SNMP table from SNMP server, using Net-SNMP binaries and Apache NiFi, and converting it to Apache Avro format. There are many possibilities to expand this design (and we do so in our project at triviadata.com). This article is only to show Apache NiFi possibilities in IoT scenarios.
Apache NiFi is also extensible framework. We could also create our own processor (and we do so at triviadata.com) for any part of the pipeline, for example the GetSNMPTable processor is still missing in NiFi. This may also be the case for proprietary protocols or protocols, which are not as common in public.
Note 1: There is GetSNMP processor in NiFi, but this retrieves only a single SNMP scalar value. Tables are encoded into series of scalars with very intristic design. These cannot be obtained using the GetSNMP processor.
Note 2: Of course you will want to specify Avro schema manually, schema inferrence is too risky in production.
Note 3: snmptable binary returns ? in the cells where the output is not returned by server. These have to handled somehow before converting to Avro (these simply break any integral column). Or you could use a patched Net-SNMP binaries.
Note 4: In case of troubles getting this up & running, here is the NiFi template: https://gist.github.com/michalklempa/d74725e1779914cc0cebaaa54542c6da